Posts Tagged ‘tuna’

I have had the best intentions with my blog, but somehow it has been two months since I last posted. I guess it’s true what they say – “parenthood is a time warp!” Our little baby is now four months old, which is hard to believe. At her four month check-up yesterday, our pediatrician recommended that we start introducing solid food now, which is something I thought we’d wait a couple more months for. My sister-in-law gave me an awesome baby food cookbook that I can’t wait to try out, as it introduces babies to all sorts of interesting flavors; the goal is to avoid having a picky eater. Before I know it, she’ll be in the kitchen with me, and I can’t wait for that!

The recipes in this post are sushi recipes. With being pregnant, this was the first sushi I had eaten in a good year! Alton recommends the following ingredients and tools to make up a basic home sushi kit:  soy sauce, rice wine vinegar, short grain rice, Nori, a rice spoon, a sushi mat, wasabi, and pickled ginger. With those basic tools and ingredients, you should be set to try making sushi.

Sushi Rice

The first step in making sushi is preparing the rice. Ideally, for sushi rice, you want to use short grain rice. Surprisingly, my grocery store did not have any short grain rice, so I had to settle for medium grain rice. Place 2 C of rice in a sieve and rinse it three times with water, or until the water runs clear.

Place the rice in a medium saucepan with 2 C of water, stirring. Bring the rice to a boil over high heat. Once boiling, place a cover on the pan, decrease the heat to low, and cook the rice for 15 minutes. After 15 minutes, let the rice stand for 10 more minutes.

While the rice sits combine 2 T sugar, 1 T Kosher salt, and 2 T rice vinegar in a microwave safe bowl. Microwave the vinegar mixture for 30-45 seconds or until the salt is mostly dissolved.

IMG_0929(1)

Sugar, Kosher salt, and rice vinegar microwaved until nearly dissolved.

Next, dump the rice into a large wooden or glass bowl (a wide wooden bowl is ideal). Drizzle the vinegar mixture over the rice, and gently mix the vinegar into the rice, using cutting motions with a spatula. Fan the rice with a paper plate as you cut the vinegar into the rice until the rice has cooled.

IMG_0932(1)

Rice, placed in a large wooden bowl and the vinegar mixture being “cut” into the rice as it cools.

Cover the rice with a moist towel until use, but do not refrigerate the rice. I think this rice tastes pretty darn good on its own, as I love its subtle sweet and vinegary flavor. Alton recommends using this rice for any sushi preparation, such as his California roll, which is up next.

California Roll

If you are new to sushi making, as I am, Alton recommends his California roll recipe for a good place to start. For his California roll, you will need your prepared sushi rice from above, sheets of Nori, a bowl of water, sesame seeds, avocado, imitation crab sticks, cucumber, pickled ginger, soy sauce, and wasabi.

IMG_0933(1)

Nori sheets, cut in half.

IMG_0935(1)

Sliced avocado and cucumber matchsticks.

To begin, cover your sushi rolling mat with plastic wrap; I chose to place my mat into a large Ziplock bag. Tear your Nori in half crosswise, and place one half sheet on your pat, with the rough side up.

IMG_0936(1)

A half sheet of Nori placed rough side up on a plastic-covered sushi mat.

Dampen your fingers slightly and evenly distribute rice on the sheet, leaving about 1/4″ uncovered at one long end. Sprinkle the rice with sesame seeds and flip the whole thing over so the Nori is facing up.

Place 4-5 thin slices of avocado so they overlap down the center of the smooth side of the Nori.

IMG_0940(1)

Avocado placed down center of Nori.

Next, place pieces of imitation crab on top of the avocado, overlapping the pieces to form a solid layer.

IMG_0941(1)

Imitation crab on top of avocado.

Finally, top the crab with cucumber matchsticks (you’ll need about 8 matchsticks).

IMG_0942(1)

Cucumber matchsticks to finish off the roll ingredients.

To finish the roll, use the mat to roll it away from you with even pressure from your hands, trying to roll it as tightly as possible.

Dampen a sharp knife and slice the roll into six pieces, using a sawing motion with your knife. Serve the roll slices with pickled ginger, soy sauce, and wasabi as accompaniments.

IMG_0951(1)

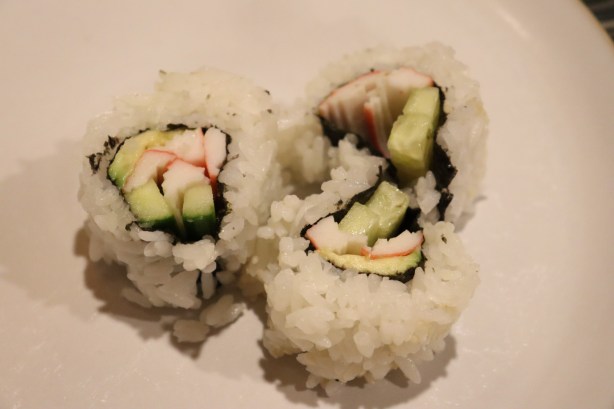
Sliced California rolls.

IMG_0952(1)

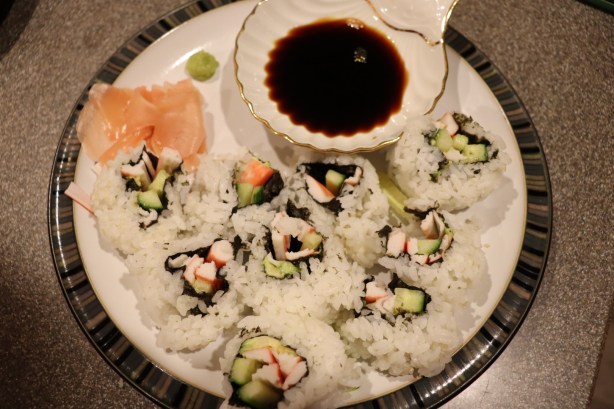
A plate of Alton’s California rolls.

Oh, and when taking sushi from a communal platter, it is polite to always use the large ends of your chopsticks. I have to say that my sushi ended up extremely ugly. I obviously need some serious practice on my rolling technique! This roll recipe is a very easy way to practice, as you do not need many ingredients. You also do not have to worry about the freshness of your seafood, as imitation crab is already cooked. Of course, real crab would certainly be superior! I may make this again, just to try my hand at sushi again. I am determined to make prettier rolls, as mine were embarrassing!

In this episode, Alton also described how to make a tuna roll, though there is no link to this recipe online. To do this, place a half sheet of Nori with its rough side up on your plastic-covered sushi mat. Cut fresh tuna into narrow slices against the grain. Place/press prepared sushi rice to within 1/4″ of the edge of the Nori. Next, place wasabi down the center of the rice, followed by the fish slices. Roll the entire thing up and cut into slices.

This episode of Good Eats sees Alton in the kitchen with his “nephew,” striving to whip up some kid-friendly sandwiches. Alton has four rules for making sandwiches:

  1. Soft fillings and spreads pair best with soft breads.
  2. A barrier (mayo, butter, oil, etc.) should be used to keep bread from getting water-logged from wet ingredients.
  3. The order of sandwich ingredients matters – slippery ingredients are not to be placed next to each other.
  4. Quality of bread is crucial, and you should only utilize bread that you would happily consume plain. Pre-sliced bread tends to be loaded with preservatives, so should be avoided.

Pan Bagnat

The first sandwich Alton makes is a pan bagnat, which translates to “wet bread.” What is a pan bagnat? Basically, it is a French version of a sub sandwich, consisting of several layers of ingredients. This sandwich is designed to be made a couple hours before consumption, as it is best to let the flavors mingle. This sandwich starts with a vinaigrette made by placing 1/2 t Dijon mustard in a bowl, and whisking in 1 T red wine vinegar, 1/2 t Kosher salt, and several grinds of pepper. While continuing to whisk, drizzle in 3 T olive oil to form an emulsion. Set the dressing aside while you build the sandwich.

This sandwich serves four people, and I only needed enough for two, so I cut the recipe in half. Bread-wise, for four servings, you want to get a 16-inch baguette. Slice the loaf in half horizontally and use your fingers to dig out trenches in the center of each half of bread, as if you are creating bread canoes. You can discard the removed bread, or use it to make bread crumbs.

Fill the trench in the bottom half of bread with 12 ounces of drained tuna fish (you can use either oil or water-packed tuna).

IMG_0225

Bottom bread trench filled with tuna fish.

Next, add a layer of 1/3-inch thick green bell pepper slices, followed by a layer of 1/3-inch thick red onion slices.

Next, add two hard boiled eggs, thinly sliced.

IMG_0228

Tuna topped with green bell pepper, red onions, and hard boiled eggs.

On top of the eggs, sprinkle on 1 C of pitted/chopped Kalamata olives.

IMG_0229

Tuna topped with green bell pepper, red onions, hard boiled egg, and Kalamata olives.

Top the olives with 4-5 slices of very ripe tomato and drizzle on the red wine vinaigrette, letting the dressing drizzle down between the ingredient layers.

Place the top bread on top of the sandwich. Wrap the sandwich very tightly in plastic wrap; you will need to overlap sheets of plastic to have a sheet wide enough for the length of the sandwich. Once wrapped, let the sandwich sit at room temperature for two hours before slicing and eating.

I made this sandwich last Friday, as we were taking a short road trip out of town. The sandwich sat in the car for the duration of our drive, and was then ready to eat for dinner when we arrived at our vacation rental.

IMG_0240

Alton’s pan bagnat. Excuse the poor lighting in this photo, as our vacation rental had horrible lighting.

Personally, I really liked this sandwich, but Ted doesn’t like canned tuna, so he was not a huge fan. He did, however, say that he would really like this sandwich if it were made with a different protein. Basically, if you’ve ever had a niçoise salad, this sandwich is that salad in sandwich form. Alton did not follow his second sandwich rule of using a moisture barrier with this recipe, so I wondered if the sandwich would end up soggy from the tuna, tomato, olives, and dressing, but it really was not soggy at all. What I liked most about this sandwich were its contrasting flavors, colors, and textures. The veggies gave the sandwich a crunch, the tomato and dressing kept the sandwich from being dry, and the eggs gave a slight creamy texture. Flavor-wise, the vinaigrette and olives were tangy, bright and salty, while the red onions gave a bit of spice/heat. The tomato added fruitiness and the tuna contributed a slight fishy flavor. It was also convenient to be able to make this sandwich ahead. I will definitely make a version of this sandwich again, though I likely will substitute something else (chicken salad?) for the tuna unless I am the only one eating it.

Cuban Sandwich

The second sandwich recipe in this episode is for Alton’s take on the classic Cuban sandwich. To make Cuban sandwiches, slice hoagie rolls in half horizontally and liberally spread yellow mustard on both halves of the rolls.

Top the mustard with a thin layer of baked ham, followed by a thin layer of roast pork (I made a small pork roast for these sandwiches).

Top the pork with two slices of provolone or Swiss cheese (I used Swiss) and two long, thin slices of Kosher dill pickle.

You can wrap the sandwiches in plastic and save them for later, or you can cook them right away. To cook the sandwiches, brush/spread them with butter and press them in a panini press for about 10 minutes.

If you do not have a panini press, you can still press the sandwiches by wrapping three fireplace bricks in foil. Place the bricks on a sheet pan. Place three more bricks (they do not need to be wrapped in foil) on a second sheet pan. Place the two sheet pans of bricks in a 500-degree oven for an hour. Remove the sheet pans from the oven and brush the foil-covered bricks with butter. Place the sandwiches on the foil-covered bricks and brush the sandwich tops with butter. Place the sheet pan of unwrapped bricks on top of the sandwiches and let the sandwiches press between the bricks for about 10 minutes.

IMG_0176

Alton’s Cuban sandwich.

I really enjoy Cuban sandwiches because I love their zesty flavor, and I thought this was a great, fast version to make at home. If you don’t want to go to the trouble of roasting pork for this recipe, you could always substitute sliced turkey, or at least that is what Alton says. I’m sure some Cuban sandwich classicists would pooh-pooh Alton’s version with provolone and turkey, but if it tastes good (and it does), who cares?

Roasted Vegetable Spread

The last recipe in this episode is for a vegetarian spread that you could use on any sandwich, or just on crackers or bread. Preheat your oven to 400. While the oven heats, toss the following vegetables with 1-2 T olive oil:  1 sliced zucchini, 1 sliced (into rings) red bell pepper, 1 sliced (into rings) onion, and 4-5 crushed cloves of garlic.

Spread the veggies on a foil-lined sheet pan and sprinkle them with Kosher salt. Roast the vegetables for 45 minutes, stirring them occasionally.

IMG_0319

Zucchini, red bell pepper, onion, and garlic tossed with olive oil, spread on a sheet pan, and sprinkled with Kosher salt.

Remove the vegetables from the oven and let them cool to room temperature.

IMG_0323

Vegetables after roasting for 45 minutes.

Place the veggies in a food processor, along with eight ounces of cream cheese, and pulse to combine.

IMG_0325

Roasted vegetables in the food processor with cream cheese.

IMG_0329

Alton’s vegetable spread, served with bread slices.

Alton recommends serving his spread on soft bread (see sandwich rule number 1 above). This spread has a sweet veggie flavor from the caramelized vegetables. While I would not be able to identify zucchini in this spread, the flavors of red bell pepper, onion, and garlic are easily identifiable. I did feel that the spread could use a bit more Kosher salt, though. We enjoyed this as an appetizer on sliced bread, though I can attest it is also good on crackers. This is a recipe that would be great to keep in mind for when you are cleaning out your produce drawer, as you could roast a variety of leftover vegetables and have a different spread each time. I plan to make this again the next time we have leftover veggies.

Chimney Tuna Loin

After I watched episode 68, I realized I was going to have to do some serious hunting to find high-quality tuna loin to sear. We live inland, so it can be challenging (and sometimes expensive) to find certain ingredients. I decided to ask the resident ceviche expert of my town where I could purchase sushi grade tuna; his expression told me all I needed to know, and I realized I would have to give in and order some fish online. A few days later, a cooler arrived at my door with a pound of fresh tuna from California.

I was struck by one thing when I first looked at this recipe online – this recipe gets great reviews. Ideally, when preparing tuna, you want to eat it the day it is purchased, but you can store it for a day or so by wrapping it in plastic and placing it on crushed ice in a perforated tub; place the perforated tub inside a second tub to catch any draining liquid, and change the ice 1-2x per day.

To sear your tuna, you will need natural chunk hardwood charcoal and a chimney starter. Fill your chimney starter to the brim with charcoal and spritz some newspaper with canola oil, placing the newspaper under the chimney starter; the oil will slow the burning of the paper. Light the newspaper with a lighter and let the fire build until it is very hot and the coals have gone down about 50%.

While your fire is heating up, trim your tuna into blocks that are about 4x4x2 inches, removing any bloodline.

img_5386

My tuna, cut into two blocks for searing.

For a marinade, combine 1/2 C soy sauce, 1/2 C honey, and 1/4 C wasabi powder, reserving 4 ounces of the marinade for a dipping sauce later.

Place the fish into the marinade for 1-4 hours. Alton marinated his fish for an hour in the show, so that is what I did. When ready to cook, drain the marinade from the fish and roll the fish in sesame seeds, coating four sides.

Place an oiled grill grate over the top of your chimney starter and add your fish. You will want to sear your fish for approximately 30 seconds per side, scraping any burnt sesame seeds off the grate each time you turn the fish.

Place the fish on a clean plate and tightly cover it with plastic wrap for 3 minutes. You can serve the fish immediately, or you can wrap it in fresh plastic and refrigerate for up to three days.

img_5398

Seared tuna, covered in plastic for 3 minutes.

Slice the fish thinly just prior to serving, and eat with the reserved marinade as a dipping sauce.

img_5399

Seared tuna, thinly sliced.

This was kind of a special dinner for us since we paid more than we normally would for fish. My fish appeared to be cut as more of a steak, rather than as a center cut of loin, so it was tricky to cut the fish into a uniform block for even cooking. If anything, my fire was possibly a little too hot, as my sesame seeds were really burning, so I would maybe let my fire go a little longer next time before commencing cooking. The marinade/dipping sauce was really zippy, packing quite a punch of heat from the wasabi.

I was happy with the quality of the fish I purchased, as it had zero fishy flavor and a nice red interior. This is one I would really like to try again, but it would probably be reserved for special occasions since the main ingredient is expensive and difficult to find where I live. However, if you happen to live where you can easily find fresh tuna, I would definitely suggest trying Alton’s seared tuna. No matter what, it was fun to try!