Posts Tagged ‘mustard’

We eat a lot of produce in our house, but I feel like we sometimes get in a rut with our veggie side dishes; our go-tos are usually steamed asparagus or broccoli with olive oil, vinegar, salt, and pepper. For whatever reason (probably laziness), I tend not to venture too far out of my side dish comfort zone, unless I take the time to find an actual recipe. The 125th episode of Good Eats forced me to try some different side dishes, as it included three recipes for different types of greens, the first being collard greens.

Pot O’ Greens

I can really only recall eating collard greens one time, which was in a Southern-themed wedding buffet. I remember liking them, so I had no qualms about prepping them with Alton’s recipe. Collard greens need to be trimmed and cleaned properly, as they have woody stems and they grow in sandy soil. To trim collard greens, fold a leaf in half along the stem line and use a sharp knife to cut out any stems thicker than 1/8″.

Stack the trimmed flat leaves on top of each other, fold them in half as you did before, and roll them from the bottom up.

Cut the roll of leaves in half the long way and then slice the greens perpendicularly.

Place your chopped greens in a sink full of cold water, swishing them around and allowing them to sit for several minutes; this will allow any sand/dirt to sink to the bottom.

IMG_2231

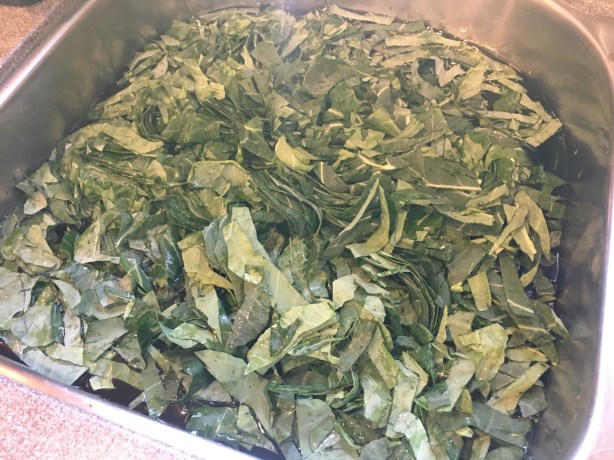
Trimmed/chopped greens placed in a sink of cold water.

To drain his greens, Alton likes to put his greens in a large zip-up pillow case. He then places the pillow case in his washing machine for one minute on the spin cycle. I did not have a zip-up pillow case, so I opted to roll my greens in a stack of paper towels.

IMG_2233

Cleaned greens on paper towels to dry.

To store trimmed/clean greens, place them in a large plastic bag in the refrigerator. For Alton’s collards, put a 1 1/2 pound smoked turkey leg in a large pot; I could only find a raw turkey leg, so I had to roast it in the oven first. Add a quart of water to your turkey leg, cover the pot, and bring the water to a boil over medium-high heat. Let the turkey simmer in the water for 10 minutes.

Next, add 1 t sugar and 1 t Kosher salt to the pot, along with 2 pounds of trimmed/cleaned/chopped collard or turnip greens.

Place the lid back on the pot and gently simmer the greens for 45 minutes, stirring every 10 minutes. Be sure to keep the heat very low, as you only want a very gentle simmer.

Use tongs to place the greens in bowls and serve them with hot sauce. To be like a true Southerner, try sipping some of the cooking liquid, which is called “pot liquor.”

IMG_2249

A bowl of Alton’s collard greens after cooking for 45 minutes.

You can also bag and freeze the cooked greens for later use. To thaw frozen collard greens, run the frozen bags under cold running water. I have to be honest that I didn’t enjoy this recipe as much as I expected to. The turkey gave the greens a meaty flavor and the greens were cooked well, so as to maintain a bit of texture instead of being mushy. I found that I needed to add a fair amount of salt to the cooked greens, as they were really lacking in seasoning. Hot sauce definitely gave the greens a needed punch of flavor, as they were otherwise not very exciting. I won’t go out of my way to make these again, but I do hope to encounter collard greens more often, as I hope to sample other preparations. Maybe I am just not as fond of collard greens as I thought I was!

Lemon Sesame Glazed Greens

Alton’s second greens recipe utilizes kale, and you will need 1 1/4 pounds of cleaned/trimmed kale. As with the collard greens above, remove thick stems from the kale leaves, chop the kale, and rinse the chopped greens in a sink of cold water.

While the kale soaks, place a roasting pan over two stove burners on medium heat. I chose to use a large skillet instead of a roasting pan because my burners are different sizes and the roasting pan does not heat evenly. Either way, brush your pan with 1 T olive oil and add 2 cloves of minced garlic and the zest of one lemon.

IMG_2437

Oil, garlic, and lemon zest in the pan.

Next, add 2 t fresh lemon juice to the pan, along with 1 T honey. Follow the honey with 1 1/2 t Kosher salt and 1/4 t pepper, and add your just-washed greens; don’t worry about drying the greens here, as you want some water in the pan. If necessary, add up to 1/2 C additional water.

Use tongs to toss the greens until they have cooked down to resemble thawed frozen spinach. At this point, remove the greens from the heat and stir in 1/2 t red pepper flakes and 1 T sesame seeds.

IMG_2441

Kale cooked down until very wilted. Sesame seeds and red pepper flakes stirred in.

Serve the kale immediately. We liked the flavors in this dish, as the lemon brightened up the greens, while the red pepper flakes gave subtle heat and the sesame seeds gave a bit of nuttiness. The honey served to lightly glaze the greens.

IMG_2443

A bowl of Alton’s lemon sesame glazed greens.

I have never been a huge kale fan, as its chewy texture is just not my favorite, and I found that to be the case with this recipe as well. I think kale lovers would really like this recipe, however, and it comes together super easily with ingredients often on-hand.

Mustard Green Gratin

The third type of green Alton uses in this episode is the mustard green, which he uses to make this gratin. As soon as I saw Alton prepare this recipe, I recognized it from the beet episode. Sure enough, this mustard green gratin is nearly identical to the beet green gratin in episode 83. For the gratin, butter the bottom and sides of a 2 or 2 1/2 quart baking dish. Beat three eggs in a large bowl and add 10 ounces ricotta, 2 ounces grated Parmesan, 1/2 t Kosher salt, and 1/4 t pepper.

Next, melt 1 T butter in a roasting pan placed over two burners on medium heat. Add 2 cloves of minced garlic to the pan, along with 12 ounces of sliced mushrooms. Add a large pinch of Kosher salt and toss the mushrooms until they have browned.

Add a pound of stemmed/rinsed/chopped mustard greens and toss until the greens have wilted.

Remove the pan from the heat and use tongs to add the greens to the egg/ricotta mixture. Stir the mixture to combine.

Place the egg/mustard green mixture in your buttered baking dish, avoiding packing down the greens. Sprinkle the top of the greens with 1 C of crushed Ritz crackers.

Bake the gratin at 375 for 35-40 minutes and let cool slightly before serving.

IMG_2177

Alton’s mustard green gratin.

We were not huge fans of Alton’s beet green gratin, but we both really liked the mustard green version. Mustard greens, if you didn’t know, truly do taste like mustard, so they bring a lot of flavor to the party. To me, I specifically tasted a Dijon mustard-like flavor in this gratin, which I found to pair very well with the creaminess of the egg/ricotta mixture. The cracker crust adds some crunchy texture and buttery flavor. This is really good and we both said we would like to eat it again. I’m surprised Alton didn’t make this addition, but I would personally add a little bit of ground nutmeg to the ricotta mixture. This was by far our favorite recipe of this episode, though it doesn’t look too pretty in the photo. Honestly, though, casseroles are just never pretty, right?

This episode of Good Eats sees Alton in the kitchen with his “nephew,” striving to whip up some kid-friendly sandwiches. Alton has four rules for making sandwiches:

  1. Soft fillings and spreads pair best with soft breads.
  2. A barrier (mayo, butter, oil, etc.) should be used to keep bread from getting water-logged from wet ingredients.
  3. The order of sandwich ingredients matters – slippery ingredients are not to be placed next to each other.
  4. Quality of bread is crucial, and you should only utilize bread that you would happily consume plain. Pre-sliced bread tends to be loaded with preservatives, so should be avoided.

Pan Bagnat

The first sandwich Alton makes is a pan bagnat, which translates to “wet bread.” What is a pan bagnat? Basically, it is a French version of a sub sandwich, consisting of several layers of ingredients. This sandwich is designed to be made a couple hours before consumption, as it is best to let the flavors mingle. This sandwich starts with a vinaigrette made by placing 1/2 t Dijon mustard in a bowl, and whisking in 1 T red wine vinegar, 1/2 t Kosher salt, and several grinds of pepper. While continuing to whisk, drizzle in 3 T olive oil to form an emulsion. Set the dressing aside while you build the sandwich.

This sandwich serves four people, and I only needed enough for two, so I cut the recipe in half. Bread-wise, for four servings, you want to get a 16-inch baguette. Slice the loaf in half horizontally and use your fingers to dig out trenches in the center of each half of bread, as if you are creating bread canoes. You can discard the removed bread, or use it to make bread crumbs.

Fill the trench in the bottom half of bread with 12 ounces of drained tuna fish (you can use either oil or water-packed tuna).

IMG_0225

Bottom bread trench filled with tuna fish.

Next, add a layer of 1/3-inch thick green bell pepper slices, followed by a layer of 1/3-inch thick red onion slices.

Next, add two hard boiled eggs, thinly sliced.

IMG_0228

Tuna topped with green bell pepper, red onions, and hard boiled eggs.

On top of the eggs, sprinkle on 1 C of pitted/chopped Kalamata olives.

IMG_0229

Tuna topped with green bell pepper, red onions, hard boiled egg, and Kalamata olives.

Top the olives with 4-5 slices of very ripe tomato and drizzle on the red wine vinaigrette, letting the dressing drizzle down between the ingredient layers.

Place the top bread on top of the sandwich. Wrap the sandwich very tightly in plastic wrap; you will need to overlap sheets of plastic to have a sheet wide enough for the length of the sandwich. Once wrapped, let the sandwich sit at room temperature for two hours before slicing and eating.

I made this sandwich last Friday, as we were taking a short road trip out of town. The sandwich sat in the car for the duration of our drive, and was then ready to eat for dinner when we arrived at our vacation rental.

IMG_0240

Alton’s pan bagnat. Excuse the poor lighting in this photo, as our vacation rental had horrible lighting.

Personally, I really liked this sandwich, but Ted doesn’t like canned tuna, so he was not a huge fan. He did, however, say that he would really like this sandwich if it were made with a different protein. Basically, if you’ve ever had a niçoise salad, this sandwich is that salad in sandwich form. Alton did not follow his second sandwich rule of using a moisture barrier with this recipe, so I wondered if the sandwich would end up soggy from the tuna, tomato, olives, and dressing, but it really was not soggy at all. What I liked most about this sandwich were its contrasting flavors, colors, and textures. The veggies gave the sandwich a crunch, the tomato and dressing kept the sandwich from being dry, and the eggs gave a slight creamy texture. Flavor-wise, the vinaigrette and olives were tangy, bright and salty, while the red onions gave a bit of spice/heat. The tomato added fruitiness and the tuna contributed a slight fishy flavor. It was also convenient to be able to make this sandwich ahead. I will definitely make a version of this sandwich again, though I likely will substitute something else (chicken salad?) for the tuna unless I am the only one eating it.

Cuban Sandwich

The second sandwich recipe in this episode is for Alton’s take on the classic Cuban sandwich. To make Cuban sandwiches, slice hoagie rolls in half horizontally and liberally spread yellow mustard on both halves of the rolls.

Top the mustard with a thin layer of baked ham, followed by a thin layer of roast pork (I made a small pork roast for these sandwiches).

Top the pork with two slices of provolone or Swiss cheese (I used Swiss) and two long, thin slices of Kosher dill pickle.

You can wrap the sandwiches in plastic and save them for later, or you can cook them right away. To cook the sandwiches, brush/spread them with butter and press them in a panini press for about 10 minutes.

If you do not have a panini press, you can still press the sandwiches by wrapping three fireplace bricks in foil. Place the bricks on a sheet pan. Place three more bricks (they do not need to be wrapped in foil) on a second sheet pan. Place the two sheet pans of bricks in a 500-degree oven for an hour. Remove the sheet pans from the oven and brush the foil-covered bricks with butter. Place the sandwiches on the foil-covered bricks and brush the sandwich tops with butter. Place the sheet pan of unwrapped bricks on top of the sandwiches and let the sandwiches press between the bricks for about 10 minutes.

IMG_0176

Alton’s Cuban sandwich.

I really enjoy Cuban sandwiches because I love their zesty flavor, and I thought this was a great, fast version to make at home. If you don’t want to go to the trouble of roasting pork for this recipe, you could always substitute sliced turkey, or at least that is what Alton says. I’m sure some Cuban sandwich classicists would pooh-pooh Alton’s version with provolone and turkey, but if it tastes good (and it does), who cares?

Roasted Vegetable Spread

The last recipe in this episode is for a vegetarian spread that you could use on any sandwich, or just on crackers or bread. Preheat your oven to 400. While the oven heats, toss the following vegetables with 1-2 T olive oil:  1 sliced zucchini, 1 sliced (into rings) red bell pepper, 1 sliced (into rings) onion, and 4-5 crushed cloves of garlic.

Spread the veggies on a foil-lined sheet pan and sprinkle them with Kosher salt. Roast the vegetables for 45 minutes, stirring them occasionally.

IMG_0319

Zucchini, red bell pepper, onion, and garlic tossed with olive oil, spread on a sheet pan, and sprinkled with Kosher salt.

Remove the vegetables from the oven and let them cool to room temperature.

IMG_0323

Vegetables after roasting for 45 minutes.

Place the veggies in a food processor, along with eight ounces of cream cheese, and pulse to combine.

IMG_0325

Roasted vegetables in the food processor with cream cheese.

IMG_0329

Alton’s vegetable spread, served with bread slices.

Alton recommends serving his spread on soft bread (see sandwich rule number 1 above). This spread has a sweet veggie flavor from the caramelized vegetables. While I would not be able to identify zucchini in this spread, the flavors of red bell pepper, onion, and garlic are easily identifiable. I did feel that the spread could use a bit more Kosher salt, though. We enjoyed this as an appetizer on sliced bread, though I can attest it is also good on crackers. This is a recipe that would be great to keep in mind for when you are cleaning out your produce drawer, as you could roast a variety of leftover vegetables and have a different spread each time. I plan to make this again the next time we have leftover veggies.

Growing up, my family had a variety of animals – dogs, cats, horses, rabbits, and lambs, among others. I had a bit of an obsession with the name Timothy, insisting on bestowing the name on each subsequent lamb. There may have even been a female Timothy in there somewhere! Though we had lambs as pets, we really did not eat much lamb when I was growing up, but I have come to really like it as an adult. My lamb consumption has been almost exclusively at restaurants, so I was excited to get to try cooking a leg of lamb to finish off the third season of my Good Eats project.

The recipe for Alton’s grilled leg of lamb can be found here. Unless you are cooking for 8-10 people, you will want to cook half a leg of lamb. The sirloin end of the leg (the end furthest from the hoof) is the portion you want to get, and you can often get your butcher to cut this portion for you. I went to good ol’ Costco to get my lamb, so mine came in a vacuum-sealed bag; Alton is not a big fan of this, as you end up paying partially for the liquid in the bag, but it was a convenient option for me. Once you get your lamb home, you want to unroll it into a flat slab.

Leg of lamb.

Leg of lamb.

Opened leg of lamb.

Opened leg of lamb.

Note that just because you get a “boned” leg of lamb, a portion of the joint may still be in place; if this is the case, you will want to remove the joint by cutting around it and pulling it out. My leg of lamb was truly boneless. Also trim off any huge chunks of fat or connective tissue, but you want to be careful not to over trim the meat, as the leg of lamb consists of several muscles held together by connective tissue. Flip the meat over so the skin side is up and trim off the fell, which is the impermeable membrane over the fat. The fell can be very tough, so you want to remove as much as possible, using the tip of your knife to get under the membrane.

Fell trimmed off.

Fell trimmed off.

Once your lamb is trimmed sufficiently, in a mini chopper combine 4 cloves of garlic, 8 mint leaves, 1 T brown sugar, 1 T Kosher salt, 2 t black pepper, 5 T Dijon mustard, and 2 T canola oil.

Ingredients for Alton's lamb:  Kosher salt, black pepper, Dijon mustard, mint, garlic, canola oil, and brown sugar.

Ingredients for Alton’s lamb: Kosher salt, black pepper, Dijon mustard, mint, garlic, canola oil, and brown sugar.

Four cloves of garlic in the chopper.

Four cloves of garlic in the chopper.

Chopped garlic.

Chopped garlic.

Eight mint leaves added to garlic.

Eight mint leaves added to garlic.

1 T brown sugar added.

1 T brown sugar added.

and 1 T Kosher salt.

and 1 T Kosher salt.

Plus 5 T Dijon mustard and 2 t black pepper.

Plus 5 T Dijon mustard and 2 t black pepper.

2 T canola oil added.

2 T canola oil added.

Mint/mustard mixture.

Mint/mustard mixture.

You will need to truss your meat, so cut five pieces of butcher’s twine that are 17-18 inches long. You will also need one longer piece of twine that is about 36 inches long. Flip the meat so the skin side is down and spread the mustard/mint mixture all over the meat, using all of the mixture.

Mint/mustard mixture spread over lamb.

Mint/mustard mixture spread over lamb.

Roll the lamb up into a neat tube shape and flip it so the skin side is facing up.

Lamb rolled into tube shape.

Lamb rolled into tube shape.

Starting in the middle of the meat, tie one of the shorter pieces of twine around the lamb, using a surgeon’s knot. You want to tie the twine tightly, but not overly so, as the meat will expand when it cooks.

Butcher's twine tied around the center of the lamb.

Butcher’s twine tied around the center of the lamb.

Continue tying the shorter pieces of twine around the meat, evenly spacing them.

Additional pieces of twine tied around lamb.

Additional pieces of twine tied around lamb.

Once all of shorter pieces of twine are tied, use the long piece of twine to tie the meat lengthwise, looping it around the shorter pieces of twine. Again, finish with a surgeon’s knot.

Longer piece of twine looped around the shorter pieces of twine.

Longer piece of twine looped around the shorter pieces of twine.

Alton used a charcoal grill to cook his lamb. We do not have a charcoal grill, so I used our gas grill. You will want to cook the lamb over indirect heat, and be sure to lube the grill grates with canola oil prior to putting the roast on the grill.

Lamb ready to go on the grill.

Lamb ready to go on the grill.

Place the lamb on the grill, skin side up, and throw some rosemary sprigs below the grates to act as a smoking agent.

Lamb on the grill.

Lamb on the grill.

Sprigs of rosemary added to the grill.

Sprigs of rosemary added to the grill.

Close the lid and allow the lamb to cook for 20 minutes. After 20 minutes, flip the meat and turn it 180 degrees.

Lamb flipped and rotated after 20 minutes.

Lamb flipped and rotated after 20 minutes.

Insert a probe thermometer at an angle and set it to beep when the meat hits 135 degrees. In the episode, Alton’s lamb took only an additional 25-30 minutes to reach 135 degrees, but my lamb took considerably longer to be done.

Lamb after reaching 135 degrees.

Lamb after reaching 135 degrees.

Once your lamb is done, remove the twine and allow it to rest under foil for at least 15 minutes before serving. We ate the lamb as our entrée, simply slicing it.

Lamb after resting 15 minutes under foil.

Lamb after resting 15 minutes under foil.

Alton's grilled leg of lamb.

Alton’s grilled leg of lamb.

We shared some leftover lamb with my parents who used the sliced lamb to make sandwiches, which they said were really good. I used the remaining leftover lamb to make my grandma’s curry. Alton’s lamb was really quite delicious and tender, and the mint mixture really flavored the meat well. If you are looking for something different to grill this summer, Alton’s lamb is a great choice, especially for a group.