Posts Tagged ‘pickle’

This episode of Good Eats sees Alton in the kitchen with his “nephew,” striving to whip up some kid-friendly sandwiches. Alton has four rules for making sandwiches:

  1. Soft fillings and spreads pair best with soft breads.
  2. A barrier (mayo, butter, oil, etc.) should be used to keep bread from getting water-logged from wet ingredients.
  3. The order of sandwich ingredients matters – slippery ingredients are not to be placed next to each other.
  4. Quality of bread is crucial, and you should only utilize bread that you would happily consume plain. Pre-sliced bread tends to be loaded with preservatives, so should be avoided.

Pan Bagnat

The first sandwich Alton makes is a pan bagnat, which translates to “wet bread.” What is a pan bagnat? Basically, it is a French version of a sub sandwich, consisting of several layers of ingredients. This sandwich is designed to be made a couple hours before consumption, as it is best to let the flavors mingle. This sandwich starts with a vinaigrette made by placing 1/2 t Dijon mustard in a bowl, and whisking in 1 T red wine vinegar, 1/2 t Kosher salt, and several grinds of pepper. While continuing to whisk, drizzle in 3 T olive oil to form an emulsion. Set the dressing aside while you build the sandwich.

This sandwich serves four people, and I only needed enough for two, so I cut the recipe in half. Bread-wise, for four servings, you want to get a 16-inch baguette. Slice the loaf in half horizontally and use your fingers to dig out trenches in the center of each half of bread, as if you are creating bread canoes. You can discard the removed bread, or use it to make bread crumbs.

Fill the trench in the bottom half of bread with 12 ounces of drained tuna fish (you can use either oil or water-packed tuna).

IMG_0225

Bottom bread trench filled with tuna fish.

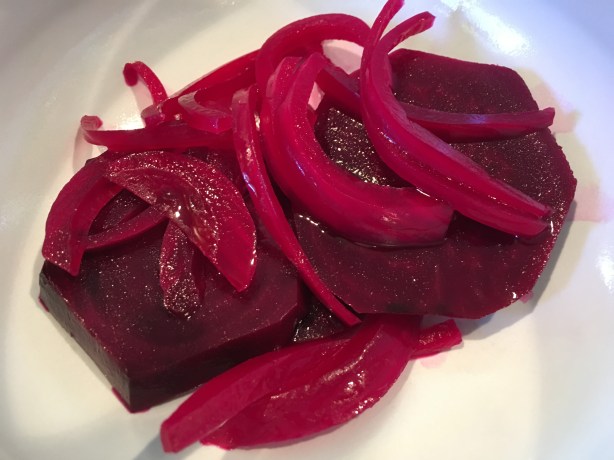
Next, add a layer of 1/3-inch thick green bell pepper slices, followed by a layer of 1/3-inch thick red onion slices.

Next, add two hard boiled eggs, thinly sliced.

IMG_0228

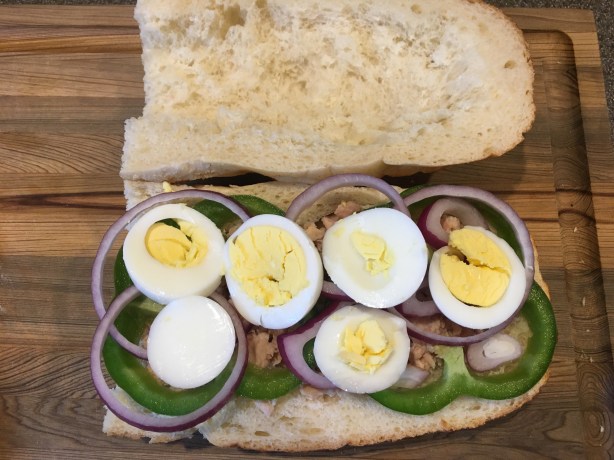
Tuna topped with green bell pepper, red onions, and hard boiled eggs.

On top of the eggs, sprinkle on 1 C of pitted/chopped Kalamata olives.

IMG_0229

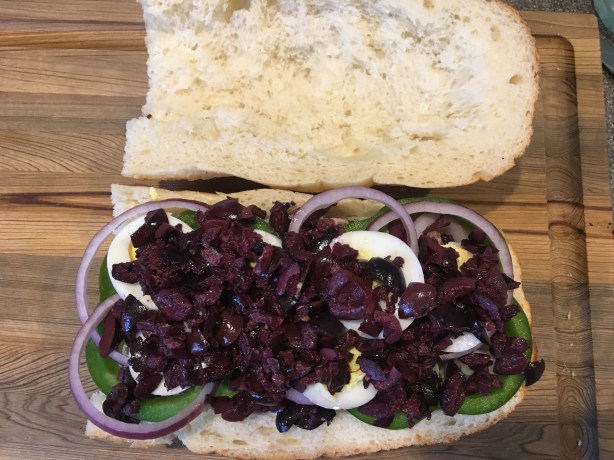
Tuna topped with green bell pepper, red onions, hard boiled egg, and Kalamata olives.

Top the olives with 4-5 slices of very ripe tomato and drizzle on the red wine vinaigrette, letting the dressing drizzle down between the ingredient layers.

Place the top bread on top of the sandwich. Wrap the sandwich very tightly in plastic wrap; you will need to overlap sheets of plastic to have a sheet wide enough for the length of the sandwich. Once wrapped, let the sandwich sit at room temperature for two hours before slicing and eating.

I made this sandwich last Friday, as we were taking a short road trip out of town. The sandwich sat in the car for the duration of our drive, and was then ready to eat for dinner when we arrived at our vacation rental.

IMG_0240

Alton’s pan bagnat. Excuse the poor lighting in this photo, as our vacation rental had horrible lighting.

Personally, I really liked this sandwich, but Ted doesn’t like canned tuna, so he was not a huge fan. He did, however, say that he would really like this sandwich if it were made with a different protein. Basically, if you’ve ever had a niçoise salad, this sandwich is that salad in sandwich form. Alton did not follow his second sandwich rule of using a moisture barrier with this recipe, so I wondered if the sandwich would end up soggy from the tuna, tomato, olives, and dressing, but it really was not soggy at all. What I liked most about this sandwich were its contrasting flavors, colors, and textures. The veggies gave the sandwich a crunch, the tomato and dressing kept the sandwich from being dry, and the eggs gave a slight creamy texture. Flavor-wise, the vinaigrette and olives were tangy, bright and salty, while the red onions gave a bit of spice/heat. The tomato added fruitiness and the tuna contributed a slight fishy flavor. It was also convenient to be able to make this sandwich ahead. I will definitely make a version of this sandwich again, though I likely will substitute something else (chicken salad?) for the tuna unless I am the only one eating it.

Cuban Sandwich

The second sandwich recipe in this episode is for Alton’s take on the classic Cuban sandwich. To make Cuban sandwiches, slice hoagie rolls in half horizontally and liberally spread yellow mustard on both halves of the rolls.

Top the mustard with a thin layer of baked ham, followed by a thin layer of roast pork (I made a small pork roast for these sandwiches).

Top the pork with two slices of provolone or Swiss cheese (I used Swiss) and two long, thin slices of Kosher dill pickle.

You can wrap the sandwiches in plastic and save them for later, or you can cook them right away. To cook the sandwiches, brush/spread them with butter and press them in a panini press for about 10 minutes.

If you do not have a panini press, you can still press the sandwiches by wrapping three fireplace bricks in foil. Place the bricks on a sheet pan. Place three more bricks (they do not need to be wrapped in foil) on a second sheet pan. Place the two sheet pans of bricks in a 500-degree oven for an hour. Remove the sheet pans from the oven and brush the foil-covered bricks with butter. Place the sandwiches on the foil-covered bricks and brush the sandwich tops with butter. Place the sheet pan of unwrapped bricks on top of the sandwiches and let the sandwiches press between the bricks for about 10 minutes.

IMG_0176

Alton’s Cuban sandwich.

I really enjoy Cuban sandwiches because I love their zesty flavor, and I thought this was a great, fast version to make at home. If you don’t want to go to the trouble of roasting pork for this recipe, you could always substitute sliced turkey, or at least that is what Alton says. I’m sure some Cuban sandwich classicists would pooh-pooh Alton’s version with provolone and turkey, but if it tastes good (and it does), who cares?

Roasted Vegetable Spread

The last recipe in this episode is for a vegetarian spread that you could use on any sandwich, or just on crackers or bread. Preheat your oven to 400. While the oven heats, toss the following vegetables with 1-2 T olive oil:  1 sliced zucchini, 1 sliced (into rings) red bell pepper, 1 sliced (into rings) onion, and 4-5 crushed cloves of garlic.

Spread the veggies on a foil-lined sheet pan and sprinkle them with Kosher salt. Roast the vegetables for 45 minutes, stirring them occasionally.

IMG_0319

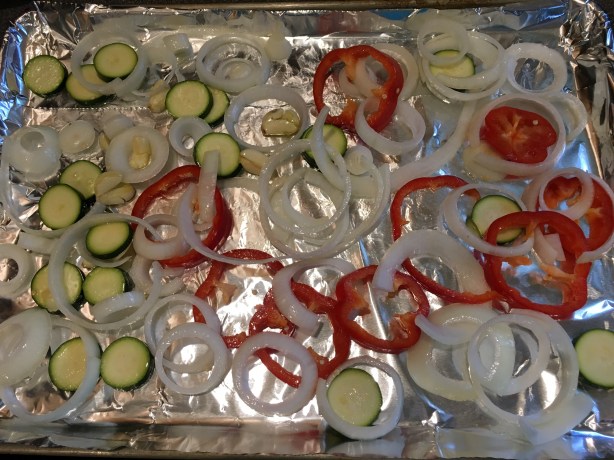
Zucchini, red bell pepper, onion, and garlic tossed with olive oil, spread on a sheet pan, and sprinkled with Kosher salt.

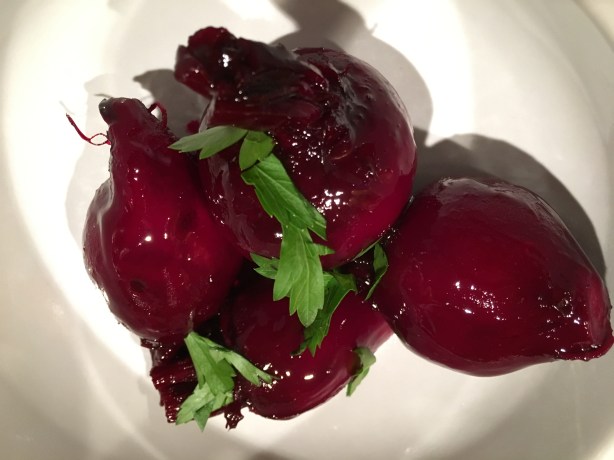
Remove the vegetables from the oven and let them cool to room temperature.

IMG_0323

Vegetables after roasting for 45 minutes.

Place the veggies in a food processor, along with eight ounces of cream cheese, and pulse to combine.

IMG_0325

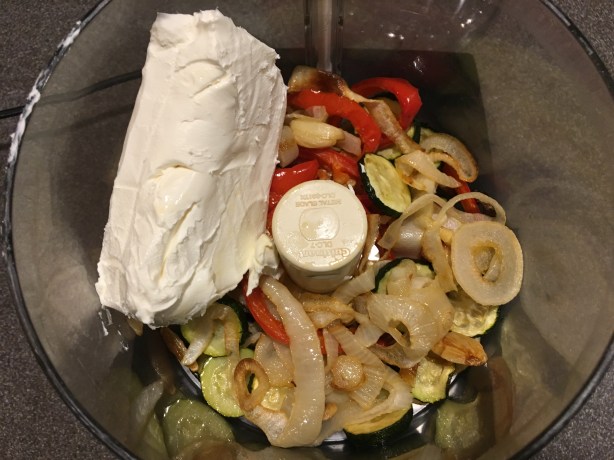
Roasted vegetables in the food processor with cream cheese.

IMG_0329

Alton’s vegetable spread, served with bread slices.

Alton recommends serving his spread on soft bread (see sandwich rule number 1 above). This spread has a sweet veggie flavor from the caramelized vegetables. While I would not be able to identify zucchini in this spread, the flavors of red bell pepper, onion, and garlic are easily identifiable. I did feel that the spread could use a bit more Kosher salt, though. We enjoyed this as an appetizer on sliced bread, though I can attest it is also good on crackers. This is a recipe that would be great to keep in mind for when you are cleaning out your produce drawer, as you could roast a variety of leftover vegetables and have a different spread each time. I plan to make this again the next time we have leftover veggies.

I have written before about how much I enjoy beets, so I was highly anticipating an entire Good Eats episode devoted to them. We didn’t really eat beets when I was a kid, so I suppose I really didn’t discover my love of them until I was an adult. These days, beets are in regular rotation at our house, as Ted loves them too.

Pickled Beets

Not only do I love beets, but I also happen to be a fan of anything pickled, so a pickled beet recipe was right up my alley. To make a couple quarts of pickled beets, you’ll need about six medium-sized beets; some of my beets were large, so I cut them in half.

IMG_2678

Some of my beets were large, so I cut them in half before roasting.

Place the cleaned beets on a sheet of foil, along with 2 t olive oil, 2 peeled shallots, and 3 sprigs of fresh rosemary.

IMG_2680

Beets, rosemary, olive oil, and shallots.

Fold the foil up around the beets, crimping the edges to form a packet. Roast the beet packets for 40 minutes at 400 degrees.

IMG_2686

Beets, rosemary, olive oil, and shallots, wrapped up in a packet.

While your beets roast, prepare your pickling brine by combining 1 C water, 1 C tarragon wine vinegar, 1/2 C sugar, and 1 1/2 t Kosher salt. Note:  I made my own tarragon wine vinegar by soaking fresh tarragon in boiled white wine vinegar for a few days. I later found tarragon wine vinegar at a store, so I made one jar of beets with my vinegar and the other jar with the purchased vinegar.

Bring the brine mixture to a boil in the microwave, which should take about three minutes on high. When the beets are done roasting, peel and thinly slice them.

You will also want to French one red onion. To French an onion, cut it in half through its stem. Cut a small piece out of each end of the onion halves, as this will allow the pieces to separate. Holding the onion with one hand, angle your knife and cut radially up to the center of the onion. Turn the onion half the other direction, and repeat.

Fill two quart jars with alternating layers of beets and onions, and pour over the hot brine. Let the beets cool before refrigerating.

Ideally, you should let these sit for a week before digging in, and they will last for about a month in the refrigerator. I have two main gripes with this recipe, the first being that the beets needed more time in the oven. The roasted beets had amazing flavor and aroma from the rosemary and shallots, but they were still a bit too firm. My other complaint is that Alton’s brine recipe just does not make enough. I found that one batch of brine was the perfect amount for just one quart of pickles, so you will likely need to double the brine. Aside from my beet pickles being a tad too crunchy, the flavor on these is fantastic.

IMG_2859

Pickled beets and onions after refrigerating for a week.

They are tangy and slightly sweet, and they add beautiful color to the plate. We have been putting pickled beets and red onions on our salads, and they add a lot of texture and flavor. I haven’t added these to pizza yet, but that’s on my list. I plan to make these again once we run out, but I will be roasting my beets for at least 10 minutes more. Oh, and I am re-using my pickle brine to make beet pickled eggs, so we’ll see how those turn out. I simply boiled my brine and poured it over hard-cooked eggs.

Glazed Baby Beets

My mother-in-law happened to serve baby beets at dinner just a few days before I was going to be making this recipe. It turns out that she had ventured to the local farmers market to get her baby beets, so I followed suit and used pretty baby beets from the market.

IMG_2717

Fresh baby beets from the farmers market.

Wash/scrub about 20 baby beets, trimming their greens and leaving just a small stem.

IMG_2780

Cleaned baby beets.

Put the beets in a lidded skillet with 2 C of apricot juice, and place them over medium heat.

Cover the pan and let the beets cook for 10 minutes.

IMG_2788

Baby beets cooking in apricot juice for 10 minutes.

After 10 minutes, add 3 T white balsamic vinegar and 2 T honey to the pan. Place the lid back on the pan and decrease the heat to medium-low. Cook the beets for an additional 10 minutes.

You want your beets to be fork-tender and for a shiny glaze to be left in the pan. If your liquid has evaporated before your beets are tender, add 1/4 C of water to the pan and cook the beets for three more minutes with the lid on over low heat. Conversely, if your beets are done cooking, but there is too much liquid in the pan, remove the beets from the pan and allow the glaze to reduce before adding the beets back to the pan. I actually found that my beets were not tender enough after the 20 minutes of cooking and I also had too much liquid, so I cooked my beets a few minutes longer than Alton recommended, removed them from the pan, and let my glaze reduce before adding the beets back in.

The resulting beets were shiny, ruby red, and had tart sweetness from the combination of apricot juice, white balsamic vinegar, and honey. I wondered if the beet skins would be noticeable, but they really were not.

IMG_2809

Glazed baby beets.

These were pretty, easy, and really quite fast to make, especially compared to most beet recipes. Try these for a pretty side dish while baby beets are still in season.

Beet Green Gratin

If you are looking for a way to use your beautiful beet greens, Alton has a recipe for you to do just that. You will need a full pound of beet greens for this, which, for me, equated to the greens of three bunches of baby beets.

IMG_2725

A pound of fresh beet greens.

Begin by melting 1 T butter in a skillet over medium-high heat and add 2 cloves of minced garlic.

Add 12 ounces of sliced mushrooms, cooking them until they are brown and tender.

Next, add your pound of cleaned/stemmed beet greens. I found that it took several minutes for the beet greens to wilt and cook down.

Meanwhile, in a bowl combine 4 egg yolks, 1/2 C grated Parmesan, 1 C ricotta cheese, 1/2 t Kosher salt, and 1/4 t pepper.

Add this cheese mixture to the beet green mixture, stirring to combine.

IMG_2746

Egg/cheese mixture added to the skillet.

Spoon the beet green mixture into a greased casserole dish (with a lid), sprinkling 3/4 C of crumbled Ritz crackers over the top.

Place the lid on the casserole dish and bake it for 45 minutes at 375 degrees (the online recipe tells you to bake it with the lid on for only the first 30 minutes).

I would not go out of my way to make this again. The proportions here seemed a bit off to me, as it was predominantly beet greens.

IMG_2765

Beet green gratin

If you want to taste umami, you will get that here. I think this would be better if the beet greens were chopped, and if the ratio of eggs/cheese to greens were higher. For example, I could see adding chopped, sautéed beet greens to Alton’s refrigerator pie recipe from episode 30. While I like the idea of using my beet greens, this recipe just was not a favorite of mine.


It is always fun in this project when I get to watch an episode of Good Eats that I have not previously seen; episode 80 was one I had definitely not seen before. The premise of this episode is that Alton goes on a local, schlocky morning show to discuss coleslaw. When the other scheduled guest fails to show, Alton becomes the main attraction, continuing on with recipes for other types of slaw. Now, I’ll be honest that I don’t get too overly excited about slaw, but Alton did make some slaws in this episode that looked pretty tasty. So, how did they turn out?

Coleslaw

A classic coleslaw was first in this episode. This recipe requires some forethought because the prep needs to begin a couple hours in advance. Start by combining 1/2 a head of green cabbage, 1/2 a head of red cabbage, and lots of Kosher salt in a colander. Leave the cabbage for a couple hours to drain any excess moisture.

For the dressing, combine 1/2 C buttermilk, 2 fluid oz mayo, 2 fluid oz plain yogurt, and 1 T pickle juice.

Whisk the dressing thoroughly, adding 1 t dry mustard and 1 T chopped chives.

When the cabbage has drained, rinse it very well with cold water and give it a few whirls in a salad spinner.

Add the cabbage to the prepared dressing, along with one sliced carrot, and toss to coat.

IMG_6306

A bowl of Alton’s coleslaw.

This coleslaw was good, but not exciting. I did like how the powdered mustard contributed a slight kick of heat, while the pickle juice added some tang. Otherwise, though, it was really just a classic coleslaw that you could buy in any deli. It would, however, make a nice condiment for a pulled pork sandwich.

Beet Slaw

After watching the episode, I was most excited about Alton’s beet slaw because I love anything with beets… and Asian pears… and goat cheese. Yep, this one appeared to be right up my alley. Before you do anything else in this recipe, you will want to steam a few beets until they are tender (it took about 15 minutes for my beets to be tender).

To make the dressing, combine in a large bowl 1/4 C red wine vinegar, 2 T lemon juice, 2 T honey, 1/4 t Kosher salt, and 1/2 t pepper.

Whisk in 1/4 C olive oil until emulsified.

To the dressing, add 2 C of jicama, peeled and cut into matchsticks.

Next, thinly slice 3 C of fennel; this is easiest on a mandolin. Add the fennel to the slaw, along with 1/4 C of grated onion.

Again with the mandolin, if you have one, thinly slice one Asian pear and add it to the mix.

Finally, peel and spiralize your beets until you have 4 C. Add the spiralized beets to the bowl.

Toss all of the vegetables with the dressing and crumble in 6 ounces of goat cheese to finish.

IMG_6334

Goat cheese added to slaw.

IMG_6335

Beet slaw.

I happened to make this slaw when my brother was visiting, and he declared that he really liked this slaw despite not typically liking beets. Ted and I thought this was great also. This recipe is a fantastic marriage of flavors and textures. The jicama, fennel, and Asian pear are light and crispy, while the beets and onion are tender, and the goat cheese adds a lovely creaminess. Flavorwise, the earthy sweetness of the beets was great with the sweet Asian pear, nutty jicama, and spicy onion. The fennel added subtle anise hints. The dressing was tangy with a hint of sweetness, and the goat cheese gave a creamy tartness. All-in-all I was really happy with this one and will make it again. I will say that it is most aesthetically pleasing the day it is made, as the beets turn everything purple as the slaw sits.

Marinated Slaw

I actually started this blog a couple days ago, but am only just now finishing it. As I type, I am sandwiched between our two Coonhounds. Brixie, our beloved little “dogter,” had a rough day today, having a lump removed from her paw that could potentially be malignant. We’re all crossing our fingers and paws that we get a good biopsy report in the next few days. Now, back to the food.

If you are looking for a make-ahead slaw, Alton’s marinated slaw may be the one for you. Essentially, this is a pickled slaw that develops flavor for three days before you eat it. I don’t know about you, but I love anything pickled. For this slaw, grate 1/2 a head of Napa cabbage, and julienne 2 red bell peppers and 2 green bell peppers (I used yellow peppers, instead of green). Alton tells you to drain the vegetables in a colander for two hours, though this is really quite pointless without adding salt to the vegetables, as nothing drains away.

Once your vegetables are prepped, bring to a boil 3/4 C cider vinegar, 1 C sugar, 2 T Kosher salt, 1 t celery seeds, and 1 T mustard seeds; I found that this recipe did not yield enough marinade, so I had to make a second batch of marinade.

Pack your vegetables tightly in a mason jar (as tightly as possible, or they will float to the top), and pour in the hot marinade. Refrigerate the slaw for three days before eating.

IMG_6346

Hot marinade poured over slaw.

I made this slaw before leaving town for a few days, and it was ready just when I returned home.

IMG_6380

Alton’s marinated slaw.

The flavor of this slaw reminds me of bread and butter pickles, as the marinade is both sweet and tangy. The mustard seeds add some great pops of crunch and zest, and the peppers retain a lot of their crispy texture. This is a bright slaw that would be a good addition for a barbecue or picnic, or just as a side dish to dinner.

Asian Slaw

After making a coleslaw, a beet slaw, and a marinated slaw, what other type of slaw could you possibly make? Asian slaw is the final recipe from this episode, and it piqued my interest the most (along with the beet slaw) when I watched the episode. Alton also happened to mention that this Asian slaw is a favorite of his.

IMG_6347

Dressing ingredients: soy sauce, lime juice, sesame oil, rice wine vinegar, and peanut butter.

In a large bowl, whisk together 1 T soy sauce, the juice of a lime, 2 T sesame oil, 1/2 C rice wine vinegar, and 1/2 C peanut butter.

With tongs, add the following items to the dressing, tossing to coat:  2 T minced ginger, 2 minced serrano peppers, 1 shaved carrot (use a vegetable peeler), 1 julienned red bell pepper, 1 julienned yellow bell pepper, 2 T chopped mint, 2 T cilantro, 3 chopped green onions, 1 head of shredded Napa cabbage, and 1/2 t pepper.

Toss everything together until well-coated.

IMG_6377

Asian slaw, tossed to coat.

We both liked this slaw a lot, and it had fantastic Asian flavor from the ginger, sesame oil, lime, and peanut butter.

IMG_6379

Alton’s Asian slaw.

We ate this only as a side dish, but I would like to make it again, taking Alton’s suggestion of serving it as an entree; for a vegetarian entree, this slaw could be served with noodles or tofu, while you could serve it with flank steak for meat lovers. Personally, I can totally picture us eating this with steak as a summer entree on the deck.

Alton did a good job in this episode of demonstrating the diversity within the realm of slaw. Most of us probably see the word “slaw” and think of one thing:  coleslaw. For me, the standouts in this episode were the beet slaw and the Asian slaw.